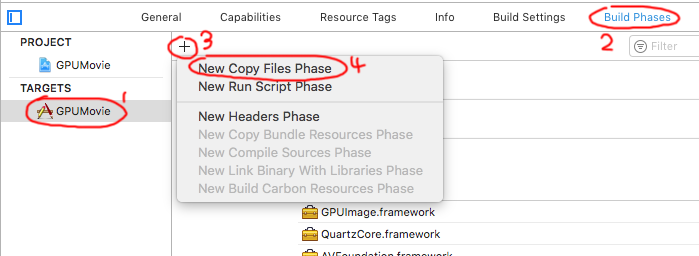
Link BinaryにGPUImage.frameworkを追加→ビルド成功→実行→Crash!
dyld: Library not loaded: @rpath/GPUImage.framework/GPUImage
原因はBuild Phasesにも GPUImage.framework を追加しなければならない。
xCode9の場合は:


AI & Game
Link BinaryにGPUImage.frameworkを追加→ビルド成功→実行→Crash!
dyld: Library not loaded: @rpath/GPUImage.framework/GPUImage
原因はBuild Phasesにも GPUImage.framework を追加しなければならない。
xCode9の場合は:
import tensorflow as tf
import numpy as np
# create data
x_data = np.random.rand(100).astype(np.float32)
y_data = x_data*0.1 + 0.3
Weights = tf.Variable(tf.random_uniform([1], -1.0, 1.0))
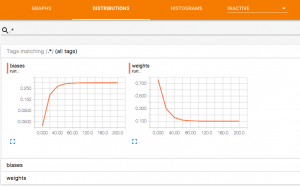
tf.summary.histogram(‘weights’,Weights)
biases = tf.Variable(tf.zeros([1]))
tf.summary.histogram(‘biases’,biases)
y = Weights*x_data + biases
loss = tf.reduce_mean(tf.square(y-y_data))
optimizer = tf.train.GradientDescentOptimizer(0.5)
train = optimizer.minimize(loss)
init = tf.global_variables_initializer()
sess = tf.Session()
merged = tf.summary.merge_all()
writer = tf.summary.FileWriter(“logs/”,sess.graph)
sess.run(init)
for step in range(201):
sess.run(train)
if step % 20 == 0:
rs = sess.run(merged)
writer.add_summary(rs,step)
# print(step, sess.run(Weights), sess.run(biases), sess.run(loss))
可視化したい情報をtf.summary.histogram(‘グラフィック名’,変数名)に追加する。
このファイルのpathは~/Document/tensorflow/tensorboard.py、そして、実行の結果は~/Document/tensorflow/logsフォルダーに保存する。
次はターミナルを起動して
$cd ~/Document/tensorflow
$tensorboard –logdir logs
表示するurlをブラウザにコピー貼り付けて完了
*urlは127.0.0.1:6006にしても大丈夫だと思う
import numpy as np
x = np.arange(3)
print (x)
>>>[0 1 2]
print (x.shape)
>>>(3,)
print (x[:, np.newaxis])
>>>[[0]
[1]
[2]]
print (x[:, np.newaxis].shape)
>>>(3, 1)
ーーーーーーーーーーーーーーーーーーーーーーーーーーーーー
import numpy as np
y = np.array([[1, 2, 3, 4], [5, 6, 7, 8], [9, 10, 11, 12]])
#2次元配列の第2列を読むと、1次元になる
c=y[:, 1]
print(c)
>>>[ 2 6 10]
#このとき、newaxisを利用してみて
c=y[:, 1][:, np.newaxis]
print(c)
>>>[[ 2]
[ 6]
[10]]
#2次元のままでしょ
#第2列と第4列を取りたい場合
y_sub = np.hstack([y[:, 1][:, np.newaxis], y[:, 3][:, np.newaxis]])
print(y_sub)
>>>[[ 2 4]
[ 6 8]
[10 12]]
変数の定義について、TensorFlowはPythonと違う
TensorFlowは変数に指定しないとダメだ
文法:
state = tf.Variable()
例:
import tensorflow as tf
# 変数stateを定義する
state = tf.Variable(0, name=’counter’)
# 定数oneを定義する
one = tf.constant(1)
# 加算を定義する (計算じゃなくて、定義することだけ)
new_value = tf.add(state, one)
# Stateをnew_valueに更新する
update = tf.assign(state, new_value)
init = tf.global_variables_initializer()
with tf.Session() as sess:
sess.run(init)
for _ in range(3):
sess.run(update)
print(sess.run(state))
ーーーーーーーーーーーーーーーーーーーーーー
実行:
1)sess.run(update) => (state <- (new_value = state+one = 0+1=1))
print(sess.run(state)) => 1
2)sess.run(update) => (state <- (new_value = state+one = 1+1=2))
print(sess.run(state)) => 2
3)sess.run(update) => (state <- (new_value = state+one = 2+1=3))
print(sess.run(state)) => 3
import tensorflow as tf
# matrix2個を作成する
matrix1 = tf.constant([[3,4]])
matrix2 = tf.constant([[2],
[5]])
product = tf.matmul(matrix1,matrix2) #matrix multiply = np.dot(m1,m2);
# method 1
sess = tf.Session()
result = sess.run(product)
print(result)
sess.close()
# >>> [[26]]
# method 2
# sessはwith内で実行、close()しなくても問題ない
with tf.Session() as sess:
result2 = sess.run(product)
print(result2)
# >>>[[26]]
ーーーーーーーーーーーーーーーーーーーーーーー
matrix1* matrix2 = [[3*2+4*5]]=[[6+20]]=[[26]]
# モジュールをインポートする
import tensorflow as tf
import numpy as np
# 参考用データを用意する
# (0.0 – 1.0) の間の乱数100個生成する
x_data = np.random.rand(100).astype(np.float32)
y_data = x_data*0.1 + 0.3
# これから本番
# もしx_dataとy_dataだけ貰って、例えば試験のデータなど
# x、yといったいどんな関係が知りたい
# つまり0.1と0.3最初がわからない
# 0.1をWeightsに替えて、初期値を(-1,1)の間のある値にする
Weights = tf.Variable(tf.random_uniform([1], -1.0, 1.0))
# 0.3をbiasesに替えて、初期値を0にする
# 実は、Weightsとbiasesの初期値は何てもいい、効率の話だと思う
biases = tf.Variable(tf.zeros([1]))
# 計算式を作成する
y = Weights*x_data + biases
# 平均二乗誤差を最小にする。
loss = tf.reduce_mean(tf.square(y-y_data))
optimizer = tf.train.GradientDescentOptimizer(0.5)
train = optimizer.minimize(loss)
# 開始する前に、変数を初期化する。まずこれを実行する
init = tf.global_variables_initializer()
# 起動する
sess = tf.Session()
sess.run(init) # 重要!!
for step in range(201):
sess.run(train)
if step % 20 == 0:
print(step, sess.run(Weights), sess.run(biases), sess.run(loss))
ーーーーーーーーーーーーーーーーーー
実行:
(0, array([ 1.22109318], dtype=float32), array([-0.40187132], dtype=float32), 0.12772495)
(20, array([ 0.39888635], dtype=float32), array([ 0.14364254], dtype=float32), 0.0074979686)
(40, array([ 0.17645188], dtype=float32), array([ 0.26000547], dtype=float32), 0.00049057766)
(60, array([ 0.1195556], dtype=float32), array([ 0.28976983], dtype=float32), 3.2097669e-05)
(80, array([ 0.1050021], dtype=float32), array([ 0.29738325], dtype=float32), 2.1000799e-06)
(100, array([ 0.10127948], dtype=float32), array([ 0.29933068], dtype=float32), 1.3740251e-07)
(120, array([ 0.10032728], dtype=float32), array([ 0.2998288], dtype=float32), 8.9902104e-09)
(140, array([ 0.10008371], dtype=float32), array([ 0.29995623], dtype=float32), 5.8807736e-10)
(160, array([ 0.10002143], dtype=float32), array([ 0.29998881], dtype=float32), 3.8534703e-11)
(180, array([ 0.10000548], dtype=float32), array([ 0.29999715], dtype=float32), 2.5172486e-12)
(200, array([ 0.10000139], dtype=float32), array([ 0.29999927], dtype=float32), 1.6451728e-13)
結果:
Weights=0.10000139(約0.1)
biases=0.29999927(約0.3)
loss=1.6451728e-13(約0)
tensorflowはy = x*0.1 + 0.3をわかった!
apple=1 #数字
print(apple)
“”””
1
“”””
apple=’iphone X’ #String
print(apple)
“”””
iphone X
“”””
a,b,c=11,12,13 #複数の変数一括定義
print(a,b,c)
“”””
11 12 13
“”””
Print String
>>> print(‘hello world’)
”’
hello world
”’
>>> print(‘Hello world’+’ Hello Hong Kong’)
“””
Hello world Hello Hong Kong
“””
ーーーーーーーーーーーーーーーーーーーーーーーーー
計算
>>> print(1+1)
“””
2
“””
>>> print(3-1)
“””
2
“””
>>> print(3*4)
“””
12
“””
>>> print(12/4)
“””
3.0
“””
>>> print(‘iphone’+4) #ダメ
“””
Traceback (most recent call last):
File “
print(‘iphone’+4)
TypeError: Can’t convert ‘int’ object to str implicitly
“””
ーーーーーーーーーーーーーーーーーーーーーーーーー
>>> print(int(‘2’)+3) #string型’2’をint型に変換
“””
5
“””
>>> print(int(1.9)) #float型をint型に変換
“””
1
“””
>>> print(float(‘1.2’)+3) #string型’1.2’をfloat型に変換することも可能
“”””
4.2
“”””